


Outdoor Pond Ideas: Above-Ground Pond

Pond Design and Penalty
Ponds don’t definitely have to be in the ground. By adopting some of the techniques and materials used in the wood foundation industry, you can build a pond above grind a whole lot faster and easier. An above-ground design may be safer, more, but always administer small children around any type of pond.
In this story, we’ll show you all the steps you’ll need to build your own version. We improved the above-ground pond with treated grove for longevity and used rough-sawn cedar for the trimming and the trellis. But if cedar isn’t available, you can use any weather-resistant material including given grove, plaster council siding, vinyl, composite lumber or any concoction of these in your region. You can induce your pond longer or wider( stand under 6 ft. long on either wall ), but don’t make it any deeper or the walls may bow. You’ll simply need a circular control to build your pond plus the usual carpentry hand implements, but a miter understand sees faster, more accurate chips. You’ll need a jigsaw to cut the twisted trellis parts.
Expect to devote about $300 for the box and trellis textiles, $80 for the liner and another $ 75 for the shoot. Fountain “masks” can range in expenditure from $25 for tiny plastic ones to $1,500 for elaborated copper or head shoots. The fiberglass lion’s chief expres penalty about $120. You can also be used find above floor pond packs at home increase stores.
If this above-ground pond doesn’t arouse your interest, check out all of our backyard pond schemes.
Special Above-Ground Pond Advantages
NO-DIG: With this design, there’s practically none of the worst part of pond building–gut-busting digging. And that too symbolizes there’s no huge pile of grease to get rid of.
FAST: Talk about instant gratification! Build the walls and trellis in the morning and assemble the pond in the afternoon. Add the shave the next day and go buy goldfish!
SAFER: Traditional in-ground ponds can be a drowning jeopardy for toddlers and babies. With this above-ground design, the risk is reduced.
Collect a distinguish and buy the materials
You can rank your pond just about anywhere you want, including on a downgrade. Of route, that’ll mean extra digging. If you nest it into a mound, simply backfill against the walls after the pond is replenished. Sunny places will promote algae growth, so site your pond in the tint if you want to reduce cleansing chores. We didn’t include a filter, but consider adding one if you’d like systematically clear irrigate. If you want a water-spewing fountain mask, you’ll need a run and a power supply. So setting your pond as closely as possible to a power source will eliminate a lot of trenching and passing subterranean cable, and you won’t have to add a waterproofed shop.( For more information type “underground wiring” into the search box above .) If you’re sitting the pond against a wall, keep it at least 2 ft. away so you can access the back for hookups and maintenance.
Buying information materials You’ll conclude everything you need at any dwelling center( view Textiles List below ). If there isn’t a dedicated region for pond plies, going to see a garden center for those textiles. Pond liner is sold in precut boxed paraphernaliums or cut from 12 -ft.-wide bulk moves, which are normally payments less. Get a 10 -ft. section or an equivalent-sized pack. Too buy the same length of pond cushion. That protects the liner from stabs. To save money, you can substitute a few beds of landscaping fabric for the pad like we did( the dwelling center was out of liner pad) or even use age-old carpeting. If you’d like a fountain disguise, you can prowl garden hubs that have well-stocked pond agencies. Or go online and do a search for “pond fountain head mask”–you’ll find dozens to choose from. Choosing a fiberglass concealment stirs the most sense. They’re flame and easy to organize. Because masks of assign metal or concrete are very heavy, they expenditure more to carry and are difficult to mount. Masks may or may not have attaching faults or equipment. So be prepared to drill your own punctures and figure out how to fasten it to the arbor. We taught two flaws in a few mane crannies and used deck fastens to hold ours in place. You’ll also need a gush and 10 ft. of water line and whatever hardware is necessary to connect it at both ends.
Click now for the full Substances List
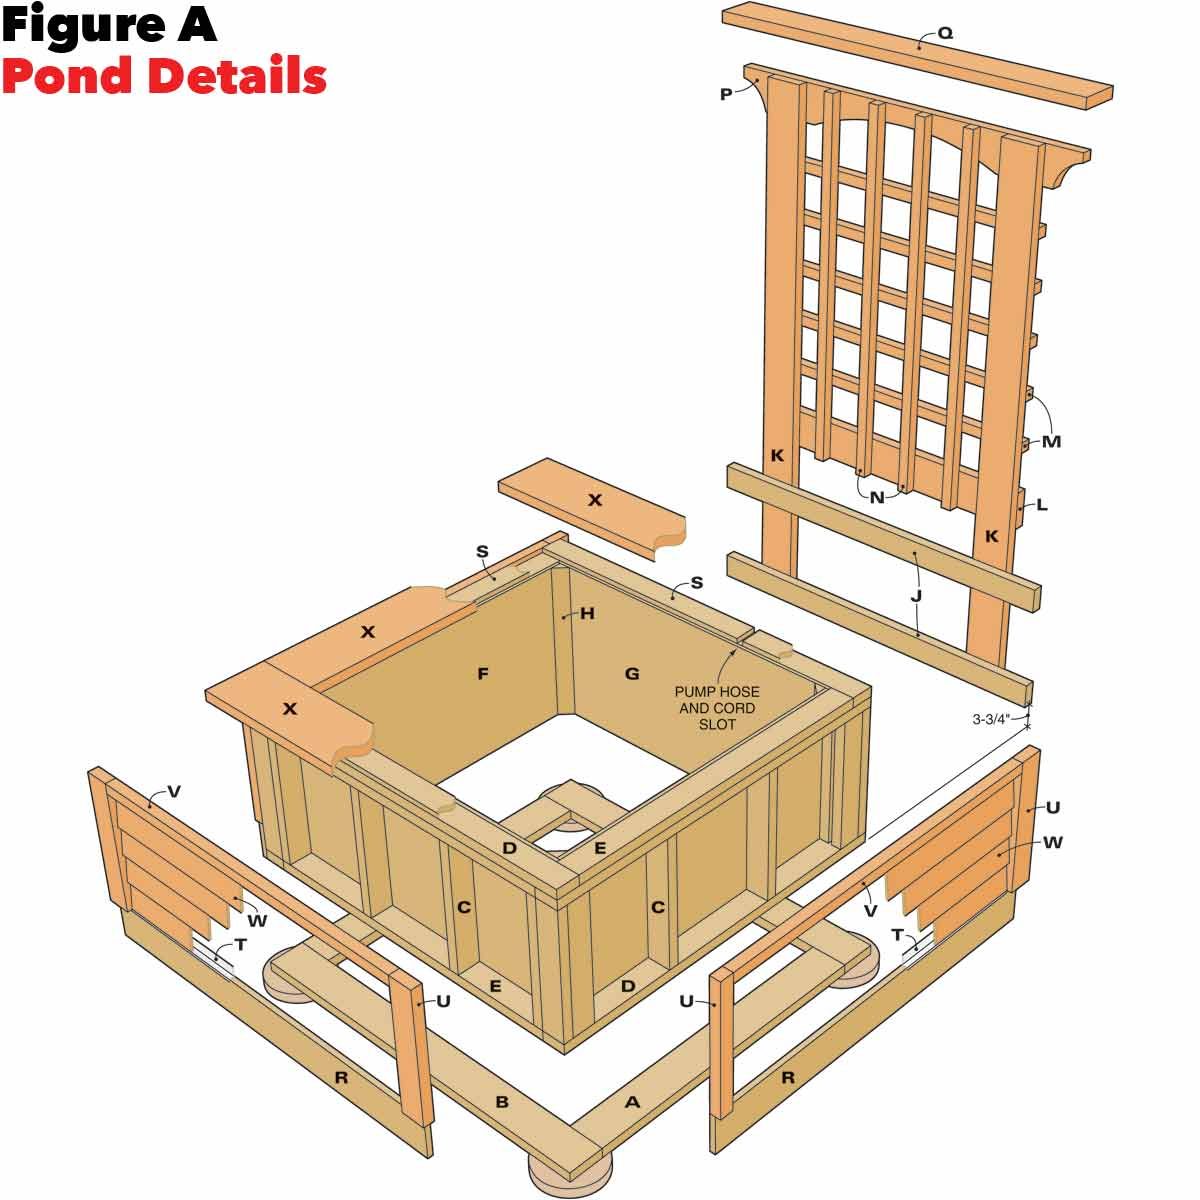
Pond Plans

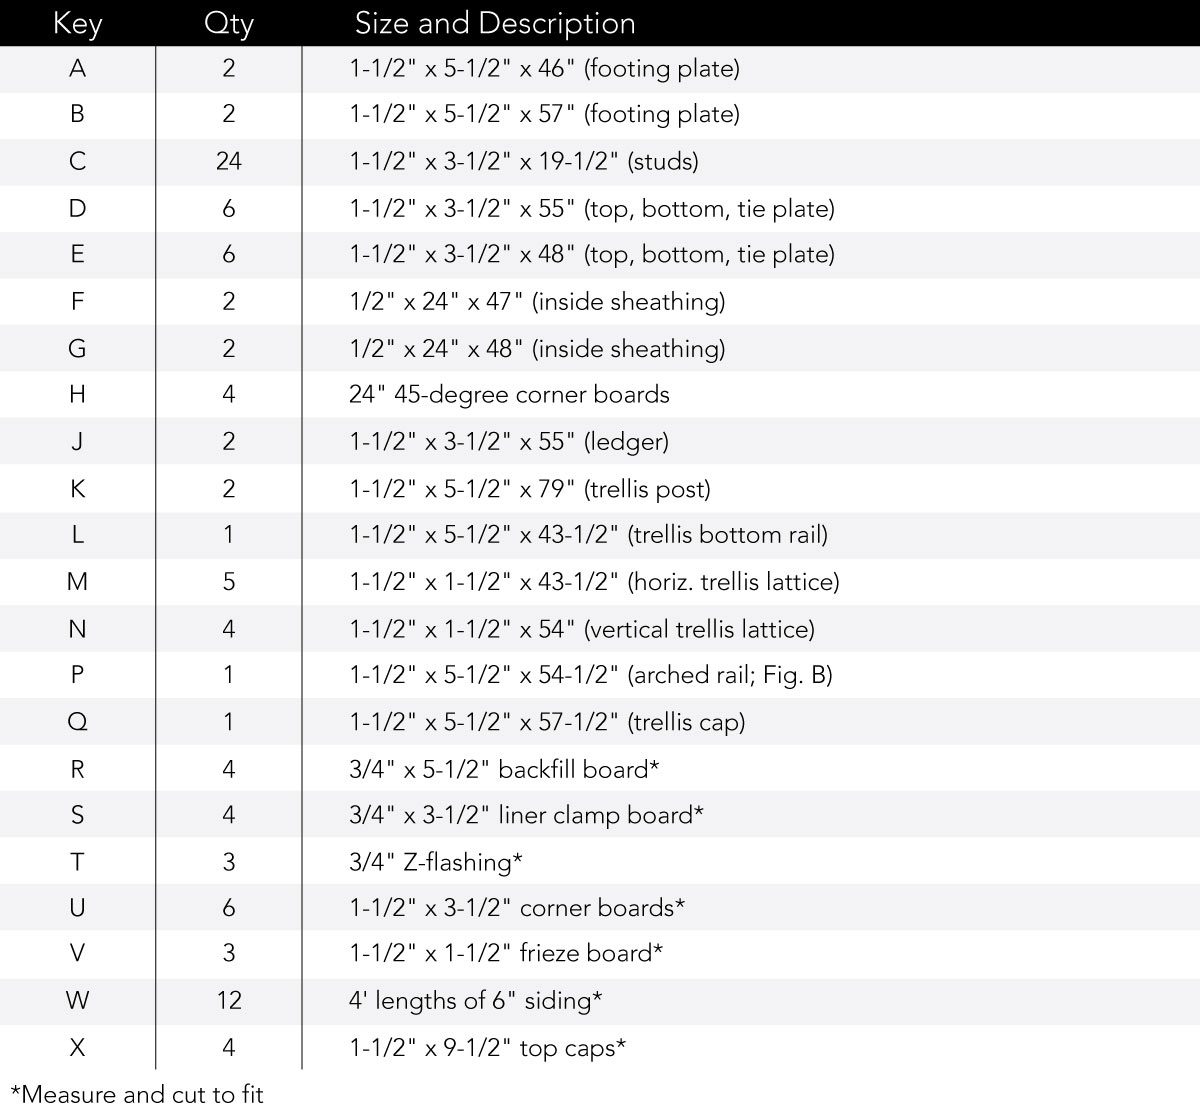
Cutting List
Construct the Walls and Trellis
First trimmed the position plates to portion and then chipped the parts and build the walls( Figure A ). Be sure to choose claws who the hell is rated for treated wood or your pond won’t last more than a few years. Leave out the angle patron boards for now so you can clamped the walls to the footing dishes at the areas formerly the walls are installed( Photo 4 ). Don’t forget to screw two 2×4 trellis ledgers to the rear wall with GRK fuckings( or replace 3-in. floor bolts ).
Build the trellis next( Photo 1 ). It’s up to you which route the trellis faces; it has two different areas.( If you appear closely, you’ll construe we reformed our head halfway through and flip-flop it around .) To chip the arched runway, first cut the 2×6 to span and then mark the measurements we indicate on Figure A. For the end bows, strand a 5-gallon container up with the marks and retrace around it. For the center curve, crouch a thin adaptable council or steel guideline to the marks and have person draw along it while you regard it. Cut the three curves with a jigsaw.
Make the Walls
Lay the footing plates on the field to finalize the pond’s location and then lay out the grounds. Mark the ground 6 in. on both sides of the plates with distinguishing colour and probe a 4-in. -deep trench on all four places. Keep the bottoms reasonably tier, but don’t beat yourself up over it. Try to stay within an inch or so of level.
Spread about 3 in. of gravel at the gutter recess and name the steppingstones, again using the foothold plates in their final status to help with exact placement. Adjust them until they’re all level with one another. Use a straight foothold slab to extend your rank wherever you need it( Photo 2 ). Finish filling between the stepping-stones so the gravel is level with the meridians. Last, reset the position plates and toe-screw them together( Photo 3 ).
Note that the walls overlap the hoofing illustrations. The liquid pres within the walls is no small-time oblige, so it’s important that all efforts be tied together. Screw together the wall recess and check to make sure the pond is square before screwing the corners to the footing platefuls( Photo 4 ). Then clamped or nail the region benefactor committees in place. Overlap the top platefuls to hold the wall recess together.
Installing the Pond Liner
Rip 45 -degree corner blockages and tack them to the inside angles to protect the pond liner. Spread a 2-in. layer of beach on the bottom of the pond to protect the liner and mound up sand against the walls to eliminate any abrupt areas( Photo 5 ). Both of these steps prevent stress on the liner. Staple the liner pad to the walls( Photo 6 ). Be sure to set all the staples or draw mis-set ones so none of them will poke holes in the liner. Trim off the liner even with the top with a scissors.
Lay and midst the liner inside the walls, pleating the recess to avoid creating a thick lump of fabric. Then begin meet the pond. As water rolls in, it’ll personnel the liner against the walls and the bottom to eliminate vacancies. As the pond fills, persistently is currently working on the pleats and smooth out the sides to keep the liner as pucker free as possible( Photo 7 ). It’ll get harder and harder to work the liner as the pond crowds, so keep at it throughout the fill. When you’re satisfied, chipped and installing the 1×4 liner secure timber. Screw, rather than nail, the secure timber to make it easier to replace the liner later. Leave a small gap in front of the trellis to feed the water line and line through( Figure A ). Then prune off the excess liner with a utility knife.
Include Trim, Side Walls and a Finish
Cut the backfill cards to fit, then rest them on the footing plateful and fingernail them to each stud. Cap them with Z-flashing to divert sea. Add the cedar angle cards. It ogles best to rip one side of each corner so the total width will be the same on the two sides. Add the 2×2 frieze committee between the corner boards at the opening of the walls and then nail on the siding( Photo 8). Lay out the siding so the exposure is equal on all the articles. Lastly, add the 2×10 top detonators. Before chipping them to length, test-fit the slice to make sure the overhangs will be equal everywhere. The top cover against the trellis won’t be exactly centered; it’ll increase a bit farther over the pond. But that won’t be noticeable. Don’t miter the top cover regions; instead, use butt joints as we did. Miters will open up in a very short time.
After going through the dreary process of discolouring the finished product with a latex-based exterior wood stain, we recommend prefinishing instead, especially if you plan on a two-color finish. Finish all the disclosed wood( especially the trellis fragments) before assembly. You’ll save tons of time and wind up with a crisper dye job.
Construct the Walls and Trellis 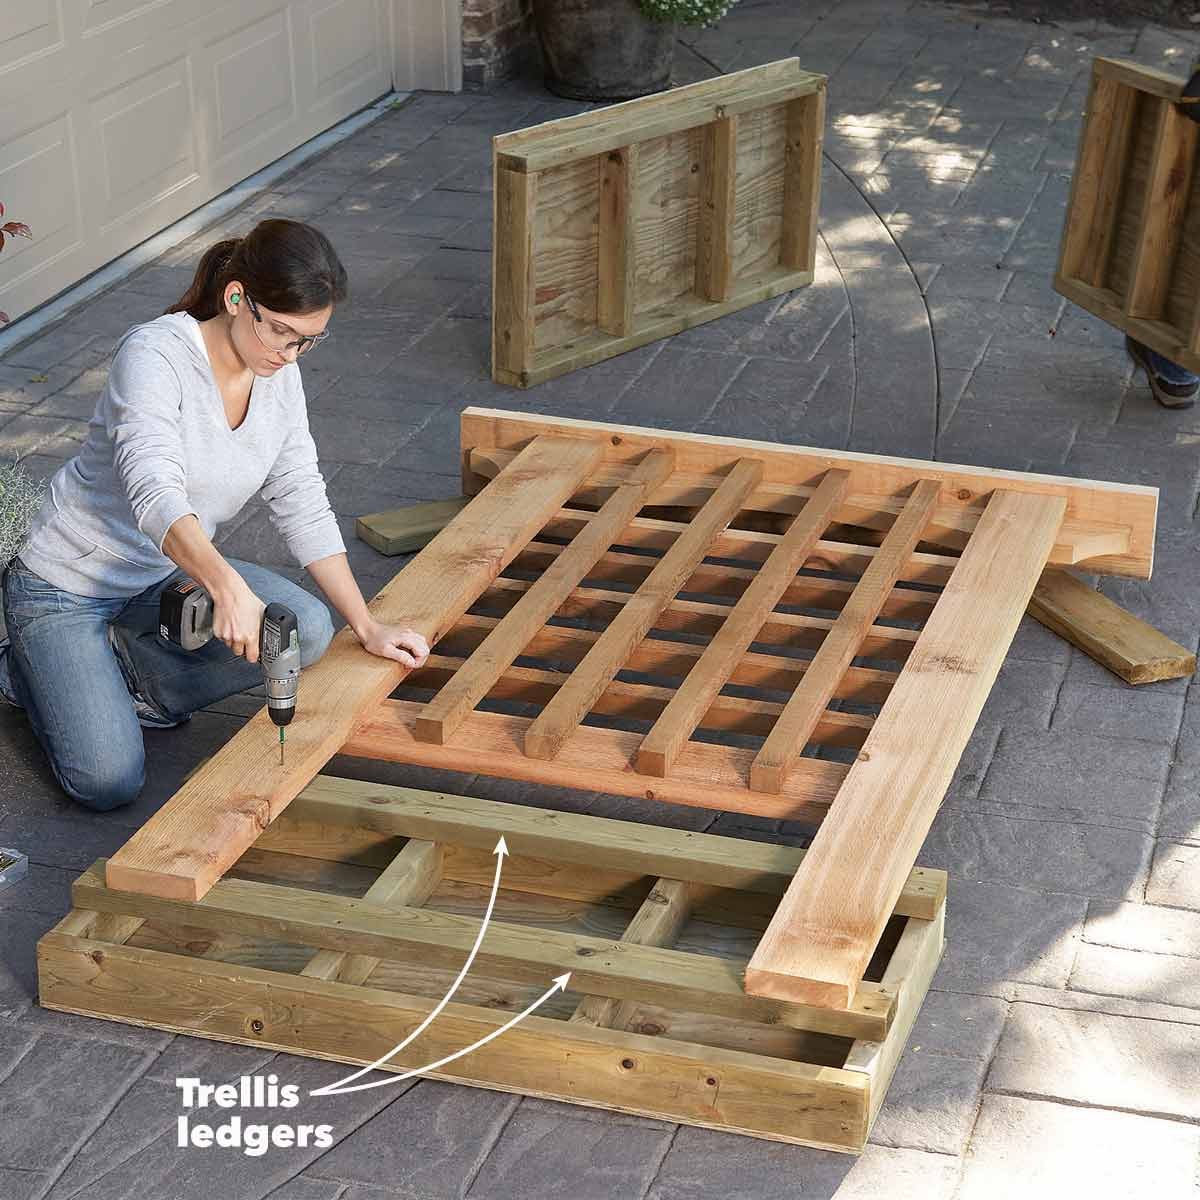
Build the walls and trellis on a big, flat work surface like your driveway. Mount the trellis on the back wall before moving it to the pond site.
Read more: familyhandyman.com


Have a look at these other posts:
 GDC Survey Explores Impact Of COVID-19 Pandemic On Game Development
 The greatest moveable Bluetooth audio system you'll be able to take anyplace
 Blood Pressure Solution Reviews – The Ultimate Guide To Control Hypertension
 ഒരു കിടിലൻ Money Making app straightforward t...
 OCC the Banking Regulator Says Regulated Stablecoins will Give Holders Confidence
 Boston’s Logan Airport begins transition to new centralized Uber and Lyft location
 thirteen Blogging Mistakes Most Beginner Bloggers Make
 How the apps that deliver issues to your door have created jobs
 Home Business – Make Money From Home With Xtreme Mail Order Riches
 lunch conferences when I can’t eat, I’ve fired my new worker earlier than, and extra
 Is it higher to purchase or lease in Los Angeles?
 North Dakota county votes to simply accept refugees regardless of Trump's government order permittin...
