


How to Hang Drywall Like a Pro
Intro to how to drywall 
Photo 1: Fasten supports at regions
Fasten wood approval wherever drywall ends have no support within 4 in. Make sure to check recess and ceiling/ wall joints.
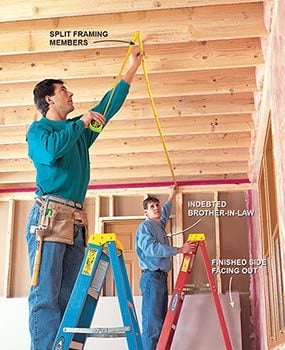
Photo 2: Measure carefully
Measure from the end of the ceiling to the middle of a joist and chipped the membrane to span. Terminate strokes should divide enclose members. Gaps at resolves and splicings should be less than 1/4 in. Mark fastening guidelines every 16 in. from result of membrane with a drywall square. Cut overall segments 1/4 in. shorter for easier fitting.
Be daring! You don’t need a truckload of implements, the mind of a rocket scientist or an Arnold Schwarzenegger-like physique to know how to hang drywall. You only need to get familiar with the fundamentals for how to install drywall to gain the confidence to tackle the job yourself.
Drywall is one of the easiest-to-use and cheapest building information in the world. Even a serious mistake will utter you chuckle, knowing you’ve unnecessary little time and probably less than five horses. And the money you save handling the task yourself will come in handy for provisioning that brand-new room.
Hanging “rock”( short-lived for “Sheetrock”) doesn’t require a lot of finesse, but it is heavy work. But if you have a strong back and you can climb four gradations without wheezing, don’t be afraid to tackle one, two or even three rooms on your own. It’s sometimes hard to interest a pro in hanging time a apartment or two, or even get on the schedule. And you’ll pay hundreds of dollars for special privileges. Besides, defining and covering the walls with a finished fabric can be satisfying.
This how to install drywall article will demonstrate the basics of hanging drywall. If you do a good job of hanging drywall, the drywall can be videotapeed and finished smoothly and easily. “Taping” refers to the process of replenish fixing holes, utilizing joint tape and three layers of videotapeing complex to strata and corners, and then sanding.( Read more about drywall taping now .) Poor drywall hanging techniques make it difficult for even a seasoned lessen to deliver a flat, uncracked face that’s free of nail dads and ready for paint. We’ll picture you the techniques and implements the pros use to get the how to install drywall job done fast and in a way that spawns taping as painless as possible.
Follow these relatively simple steps to learn how to install drywall and experience that brand-new bedroom, family room or, if you’re really lucky, billiard office!
The pros never lock drywall with claws anymore, and neither should be used. Screws anchor the rock solidly to the framing, do less damage to the paper face, and are less likely to cause fastener daddies down the road. Nail papas are a nuisance to fix and generally won’t appear until after you’ve applied the final hair of paint.
A drywall clamp handgun is a high-speed, low-torque drill precisely adapted for installing drywall( Photo 11 ). With an adjustable nosing, it mounts nails very quickly at precise the compensate magnitude. It may be worth buying if you’re planning to hang a lot of drywall. If you decide to rent, plan to tack up all the drywall with as few hammers as is practicable, then screw off all the rock at the same time to save rental costs. There are numerous styles of adapters and components for converting conventional drills into screw firearms, but the results aren’t as good. There is no substitute for a drywall nail gun.
Selecting Drywall
Most drywalling calls for three basic categories and densities of textile 😛 TAGEND
Half-inch for framing straddles of 16 in. or less. Five-eighths-inch for encompass up to 24 in. on ceilings. The 5/8 -in. drywall is also called Type X or burn resistant. It is used in areas where a burn wall is required, such as between a house and attached garage. Consult your local structure official for installing specifics. Half-inch drywall that’s water-resistant for muggy areas such as tubs( humid , not soak ). This information is unacceptable that ceilings or areas such as tiled shower pens. Mold-resistant drywall is also sold for regions like vaults where mold might be a concern.
Door and window jambs and electric outlet are generally set up for 1/2 -in. drywall, so check to confirm. Three-eighths-inch and 1/4 -in. are available as well but are rarely exploited except on arched wall faces or areas where thinner rock is required. For example, if you’re patching age-old plaster walls, 3/8 -in. may be the only thickness that will match the depth of the plaster.
Drywall generally comes in either 4×8 or 4×12 widths. If you live in an area large enough to support a commercial-grade supplier, it’ll offer more hodgepodge than an average lumberyard. It been in a position to 9-, 10 – and 14 -ft. spans, 54 -in. diameters for 9-ft. ceilings and odd occasions like flexible drywall for swerved faces. Drywall portions don’t radically change overall textile expenditure. If you think you can handle 12 -ft. expanses( and if they’ll fit through the stairwells ), they’re the way to go. You’ll have far less litter and fewer seams to tape. Keep in brain that a 4×8 membrane weighs 55 lbs. and a 12 -footer about 82 lbs.
Preparation and saying 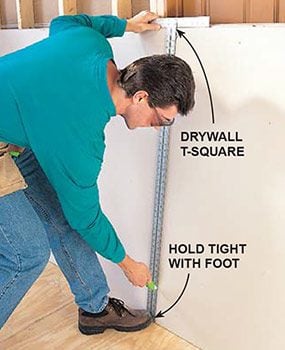
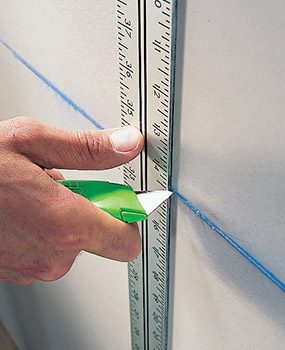
Scoring drywall
Measure the segment needed and score the paper face with a practicality spear, squandering a drywall square as a straightedge.
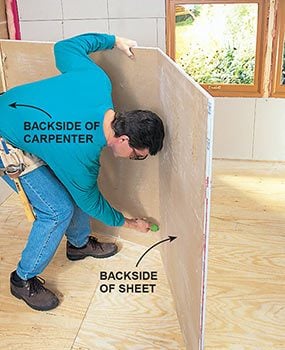
Snapping drywall
Snap the membrane, fold it open and cut through the paper on the backside.
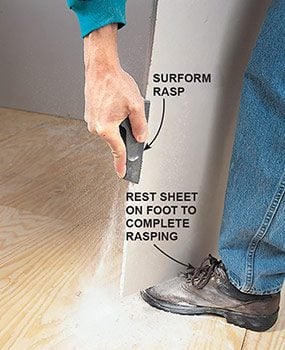
Smooth the leading edge
Smooth rough rims on reduction ends with a Surform tool to ensure tight joints.
This is your last chance to fix any problems that will soon be hidden behind finished walls. Have leaky plumbing restored and position( or have installed) any added electric outlet or substitutions, dedicated computer modem courses or channels, and phone jacks. This is also the time to add any missing drywall benefactors( Photo 1 ). You’ll need to support any discontinues that are unsupported for more than 4 in.
Estimate how much to drywall a apartment by adding up total surface areas and dividing by square hoofs per expanse. A 4×8 sheet will handle 32 sq. ft. and a 4×12 sheet will shield 48 sq. ft. Don’t rebate for doorways and windows unless they’re very large. I frequently order just enough to do the number of jobs. I’d rather go out for a few more expanses than get stuck with additional rock. It doesn’t store well and the garbologists aren’t fond of procure 4×8 membranes on the curbing next to your trash can.
While small quantities are easily carried in a pickup, large quantities( 12 -ft. expanses, or more than 10 expanses of different sizes) are best delivered. A good-sized room’s worth of boulder can weigh as much as a small beluga whale!
Discount lumberyards and residence midsts will usually deliver for a fee, but they’ll exclusively send out one person, and you’ll have to help dump the truck. The move will probably help you carry sheets into the garage, but that’s about it. Contractor-oriented full-service lumberyards and business drywall suppliers will charge more per membrane, but they’ll unloaded the truck and pull the boulder into the apartments you’re going to hang. A upturn truck( a truck with a small crane for elevating) may even be available for second-floor bringings if there is a door or window opening large enough to feed membranes through. Coordinate this with your lumberyard, concluding sure you both understand website specifics, personnel the needs and available equipment.
Set down the drywall with the finished backs facing you. This is the side you’ll want to lay out on and trim from. It is required to be stacked on edge and evenly corroborated. Drywall deflections quickly and isn’t easily straightened.
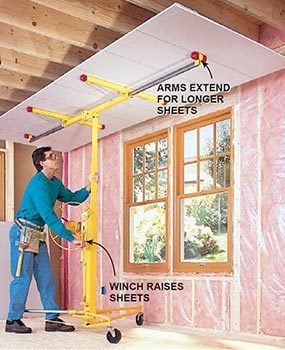
Using a Drywall Lift
Save your back and rent a drywall filch for a epoch. A face-lift is fantastic if you’re shorthanded or positioning 12 -ft. membranes. It disassembles readily, weighs about 75 lbs. and will fit in a minivan or tiny getaway. A raise makes it possible to hang cliff solo, but it’s still nice to have a helper for loading the cliff onto the lift. A lift inclines from horizontal to horizontal. Rotates allow you to roll it up to the drywall stack, load a expanse onto the rack, roster it back into situation and crank the expanse up into plaza. Although a filch can also be used for wall placement, its strong suit is ceilings.
 Drywall lift
Drywall Tools List
Highly Recommended 😛 TAGEND
4-ft. T-square Drywall shafted gun Keyhole drywall attended Surform tool Flat saloon Utility bayonet Chalk order Trim mallet( 16 or 20 oz .)
Nice-to-have stuff 😛 TAGEND
Drywall investigated Drywall hammer. It’s superior to a conventional hammer because its convex waffled head plans fingernails without break-dance paper. Paw raise Drywall raising( typically rented ), or substitute a muscular marriage who owes you big time. Spiraling cutout interpret
Installation 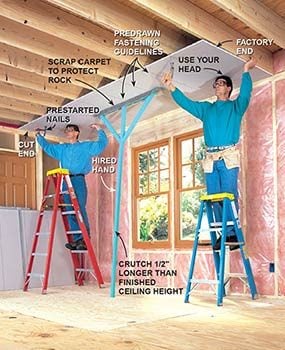
Photo 3: Tack the expanse in place
Hoist the ceiling expanses overhead and way them into place working a “crutch” made of 2x2s to support the lion’s share of the load. Prenail and caste the sheet, tacking it to the joists.
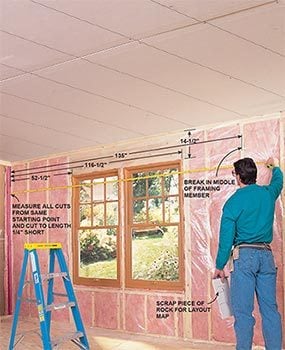
Photo 4: Measure the upper sheet
Measure the distance from a wall region to the center of a framing member, likewise recording distances for cutouts and opening and opening openings. Avoid placing seams over doorways and space corners, where they may crack.

Photo 5: Cut “todays opening”
Cut window and door notches from a single membrane by sawing surfaces with a drywall interpret. A keyhole perceive is slower, but it is an acceptable substitute for long cuts.
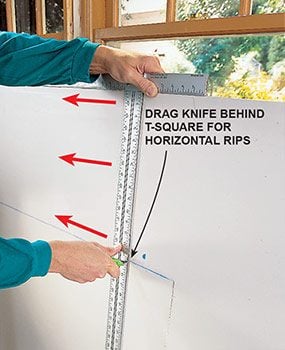
Photo 6: Finish the trim
Score the third side of the notch with a practicality spear, click the section release and ended the gash from the backside.
Pro gratuity
For quick rip trimmeds, draw your utility pierce behind the T-square as you slither it along the top( snuggle the blade of the knife against the ruler part of the square ).
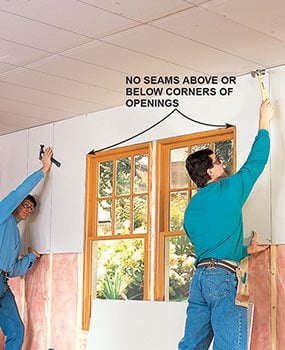
Photo 7: Hang the expanse of drywall
Lift the top wall sheet, supporting it tight against the ceiling, and tack it into sit with hammers. Don’t forget to mark fastener guidelines before lifting.
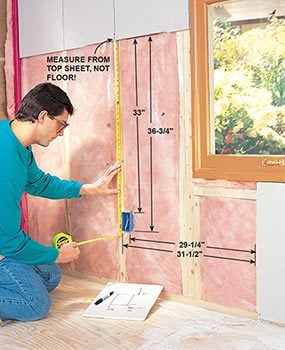
Photo 8: Measure cutouts
Measure electrical container cutouts from all four features. Check all layout evaluations twice before chipping!

Photo 9: Mark and trimmed the drywall
Transfer appraisals to the drywall and trimmed the store casket openings with a keyhole saw.
Here’s where you’ll appreciate the informality of working with drywall. After scoring the breast side with your practicality spear, simply snarl it open like a dime novel. One last cut along the back rim of the expanse and you’re in business.
Professionals always do the eyelids( ceilings) first. That route, the wall bits support the ceiling bits. Now a word for you rookies: Hanging drywall over your honcho is no fun. Drywall is heavy, awkward and hard to get into position. To obligate the number of jobs somewhat easier, make a “crutch”( Photo 3 ). To make it a lot easier, pony up for a drywall lift.
Next, hang the top wall row. This is required to be propagandized close-fisted against the ceiling before affixing( Photo 7 ). Never break braces at the edge of a opening or opening. These seams will eventually crack, and the buildup of taping materials will conclude investing casing difficult.
After installing the top layer, lift in the bottom sheets. Foot heaves cultivate great for prying that bottom row tight against the top row( Photo 10 ). That all-purpose flat barroom will do the job nearly as well.
Whenever I hang drywall, I’m always startled at just how small those doggone switchplate cover-ups are( although larger ones are available if you need them ). Take special care in planning and divining cutouts for electrical containers( Photos 8 and 9) because if you miss, that oversized shop puncture is a bear to fix. Fixing a poorly trimmed or overcut hole is tricky, and the amend will never gaze quite right.
Spiral Cutout Saw
Although we don’t show one in use here, pros now use spiraling considers to cut openings for shops, light-footeds and even entrances and windows. The basic sentiment is easy: Just mark the reckon core of the store or light, hang the expanse of drywall, and then poke the thin spiral part through the center mark and follow the edge of the fixture the whole way around. For door and window openings, hang the expanse across the opening and then follow the framing with the coiling bit–no quantifying necessary, and you get a perfect cut each time. Of direction it takes a little practice to get the hang of the tool, it kicks up a lot of dust, and the basic tool rates $70 to $100, but if you’re doing more than one apartment it may be worth the financing. For more information, envision How to Use a Spiral Saw on Drywall
 Spiral realized in use
Fastening basics 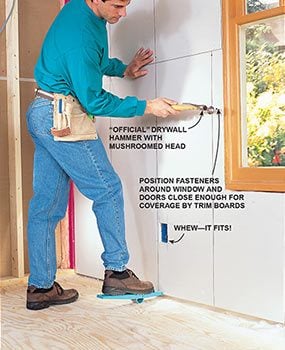
Photo 10: Lever drywall into arrange
Hoist bottom row with a foot elevation or flat saloon and way into arrange. If an opening needs small-minded changes, scrape the leading edge with your utility knife.
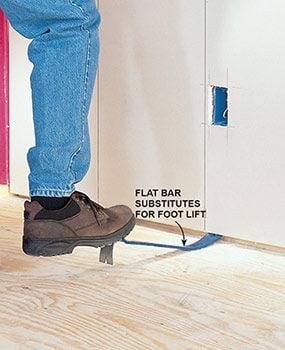
Foot raising alternative for how to install drywall
If you don’t have a foot lift handy, merely use a flat bar. You may need to use a piece of lumber for the purposes of the flat bar for more leverage.
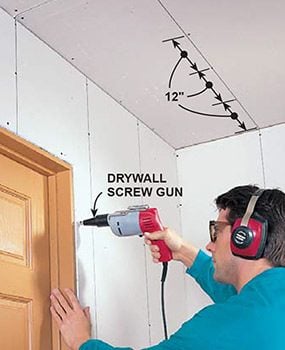
Photo 11: Finish affix with screws
Screw ceiling and walls with a screw shoot. Set shafts and tacks somewhat below the surface of the working papers, being careful not to break through into the gypsum core. To hide the fastenings, outlook them close to openings around spaces and openings so trim will plaster them.
Selecting fastenings is simple. Use 1-1/ 4 in. fastenings for 1/2 -in. boulder and 1-5 /8 in. fasteners for 5/8 -in. stone. Longer is not better. This might be hard to believe, but longer screws and claws are more prone to nail sounds. Use as few claws as is practicable and only to tack up the membranes until you can get the shafts in.
Use five fixings per framing member, one in each diminished rim and three more spaced evenly every 12 in.( Photo 11 ). Slightly angle clamps on the ends of expanses, where there is only 3/4 in. of timber left to catch clamps. If you run them in too close to the end, the drywall core will crack and they won’t contain well.
Using the framing recommendations you’ve outlined( Photo 3 ), prestart a few tack claws in the sheet before elevate it into importance. In other messages, start a few cases hammers into the rock about 1/4 in. penetrating or so. They’ll stay there, ready to be driven home when the sheet’s in place. You’ll then be able to dedicate one pas to hammering and the other to supporting the sheet.
Any room that is subject to high humidity deserves shocked fasteners. Conventional drywall clamps in these areas may eventually corrode and bleed through the finish.
After installing all the drywall, drag a putty knife over every single fastener. If you discover a click( Photo 12 ), you’ve find a charlatan fastening that needs to be set. Is not usage your hammer to set a proud( protruding) screwhead! Blasting it in with a hammer may separate the screw, creating a bigger hole to patch, and will generate a claw papa down the road. Just screw it in a tad more with a screwdriver or, better hitherto, a cordless drill. Too, be sure to remove any fastenings that missed the framing representative for this how to install drywall job.
Driving Screws
Drive clamps accurately! The newspaper on the outside of the drywall is what views the sheet tighten to the wall. An overset fuck has little nursing superpower and may pop in the future. If you do overdrive a shaft, first position a accurately defined fuck about an inch away from it and then remove the improperly placed screw.
Finish setting underdriven nails with a screwdriver or cordless teach. If mounting a fixing solutions in break-dance article, oust the fixing with a properly driven one.
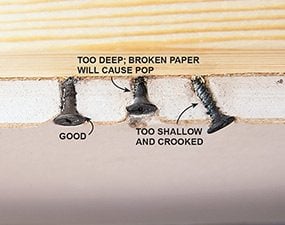 Right way and wrong way
Final don’ts and do’s for how to install drywall 
Photo 12: Check for protruding clamps
Check screwheads and fingernails for proper depth by drawn-out a putty spear over each thought and listening for clicks.
Don’t try to save a couple of bucks by utilizing pieces of drywall when you should be using a full membrane. The age and endeavor spent taping extra seams is rarely worth the money saved. Always participate tapered boundaries to tapered sides. Careen seams with each row of cliff. Fantasize onward to draw taping as easy as possible. Remove broken corners and liberate chunks of boulder, and cut off any pimples. These will all be filled in last-minute with a fast-setting joint compound. Never abuse lessened shapes for outside recess where reces ball exits. The thinner edge of the drywall constructs it hard to properly fill the beaded margin with videotapeing deepen. As your last duty, extended a putty bayonet over all screwheads( Photo 12) and cause all fastenings below the surface. Since you framed them in, it’s your job( not the taper’s) to make sure they’re suitably set. Diminishes get very upset when they have to spend half of their first day on the job repairing improperly placed fasteners. And the diminish might be you.
Required Tools for this How to Install Drywall Project
Have the necessary tools for this how to install drywall DIY campaign lined up before you start–you’ll save occasion and annoyance. 4-in-1 screwdriverChalk lineCordless drillDrywall sawHammerLevelPry barSafety glassesScrew gunStepladderT-squareTape measureTaping knifeUtility knife
You’ll likewise need a Surform tool, a drywall hammer, a hoof elevation and a drywall lift.
Required Fabrics for this How to Install Drywall Project
Avoid last-minute shopping errands by having all your fabrics ready ahead of time. Here’s a list you need to know how to install drywall. 1-1/ 4-in. drywall screws1- 5/8 -in. drywall screws2 x 2( for optional crutch) DrywallDrywall nails
Read more: familyhandyman.com


Have a look at these other posts:
 Make Money From Home one hundred+ Dollar a Day! -REAL DEAL-
 ninety Day Fiancé: Forged Members Who Ought to Completely Keep Off Social Media
 How to Make Money together with your Voice ($one thousand per hour working from house)
 Everything You Need to Know About Millennial Home Buyers (2019)
 How Does Day Trading Really Work?
 How To Stop Your Cat From Peeing Outside the Litter Box
 My Coaching Session: Navigating Overwhelm, Moving and Feeling Stuck
 Weekly Astrology Forecast for All Signs August 24 2020
 Focus on stability sheets as an alternative of K&L in inventory choice: Shah
 S Money Lessons I Learned from My Mom
 Here’s how my $200 journey insurance coverage plan gave me virtually $M,300 to spend in Italy
 Google Pixel Watch launch date, worth, information and leaks
