


Electric vs. Hydronic Radiant Heat Systems
The the potential benefits of infloor heat
Once you removed your fuzzy slippers and discover the consolation of warm floorings, you’ll be sold. Heated floors, often announced gleaming floors or a radiant hot system, render benefits beyond paw consolation. They preserve entry and bathroom floors cool and provide cavity heating in coldnes chambers. You can even turn away the thermostat for your primary heating system and still continue some offices warmer.
In this article, we’ll walk you through the types of radiant floor methods you can install in your home. We’ll tell you the pros and cons, and support you key installation techniques. This will help you decide whether to take on the project yourself or hire health professionals. These heating systems are most often lay under ceramic tile in showers, but bear in mind that you can add hot under any type of flooring material( attend “Floor Coverings and Heated Floors, ” below ). All floor heating systems warm the storey with either energy or hot water.
Electric structures are simple and cheap
Electric floor structures run just like an electric blanket: Electricity rolls through “resistance” cable and organizes hot. Because electricity is fairly expensive, relatively small homes are entirely heated by in-floor electric plans. Nonetheless, these systems are great for constituting specially cold storeys foot-friendly. They too improve the temperature in an otherwise chilly apartment by a few severities. The heated floor in a bathroom utters going out of the shower a cozier potential on a coldnes daytime. That’s the payoff.
Electric systems have three components: hot cable, a thermostat and a temperature sensor( Figure A below ). The thermostat is connected to the home’s power supply and turns the heat on and off according to the floor’s( not the room’s) temperature. A sensor installed in the storey together with the cable tells the thermostat how warm the storey is.( Most people promote a flooring temperature of 80 to 90 degrees F .) The thermostat and sensor are packaged together; cable is usually sold separately. Don’t use a thermostat from one make with cable from another.
The electrical alliances necessitate exclusively basic wire know-how, and laying the flooring cable is a DIY-friendly project. Because of this easy installation–and the lower cost of materials–an electric structure is usually the best choice for small-scale projections like heating a kitchen floor or warming up a cold bathroom. Adding electrical hot to a typical bathroom when you install a new flooring lends exclusively $200 to $300 to the cost of the project. Operating expenditures are normally about a half penny per square foot per day.
Often the biggest challenge is “fishing” electrical cable through finished walls to the thermostat and cable. Since these systems generally draw only 10 to 15 watts per sq. ft ., you can usually connect them to an existing circuit to heat a conventional lavatory. For a larger room, you may have to run a new cable to the main panel and compensate an electrician about $120 to connect the brand-new route there.
If you’re installing heat over a wood-framed floor, plaza fiberglass insulation between the joists to drive the heat upward. The organization will work fine without isolation but will be more efficient with it. Before you install an electric system over a concrete storey, check the manufacturer’s instructions — they may require a layer of sud isolation over the concrete before the heat cable is installed.
Tip: When you estimate the square footage of a room, include only the areas where you can walk; it originates no smell to heat the flooring under contraptions or behind the toilet.
Figure A: Electrical Floor Heat
The cable renders heat and warms the floor. A thermostat connected to a sensor controls the temperature of the floor.

Electric structure# 1: Loose cables ($ 3 to$ 6 per sq. ft .) 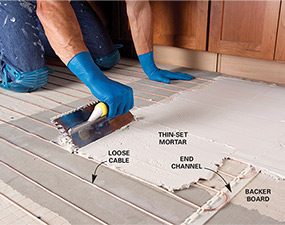
Photo 1: Thin-set mortar proficiency
String cable between dissolve directs and fasten the cable to the floor. Screed thin-set over the cable to create a flat face. 
Photo 2: Self-leveling technique
Install plastic lath and release cable. Pour self-leveling compound to embed cable and create a perfectly flat, smooth surface.
The cable comes on a spool, just like any other wire. Loose cable is by far the cheapest course to heat a floor and it’s just as effective as the other systems. The drawback of loose cable is installation time; you have to position the cable in a serpentine blueprint, fasten it with lots of hot glue or staples, and then “embed” it.
Most loose cable systems include death directs that template spacing( Photo 1 ). You can arrange cables close together to stimulate the flooring heat up faster and reach a higher temperature or far apart to use little cable. Creators offer various cable lengths to suit the floor’s square footage. You can’t splice areas of cable together to serve a larger room or reparation injury cable( this is true of all electrical arrangements ). Fasten the cable every 6 in. so it can’t change or float while you embed the cable.
Caution: Work carefully with your trowel. If you nick the cable, the entire system won’t work.
There are two ways to embed cable: You can reinstalling the cable over tile backer committee and then cover it with “thin-set, ” the mortar adhesive used only for ceramic tile( Photo 1 ). The thin-set flinches as it medications, so you may have to add a second layer after the first hardens to level it out. But generate a perfectly flat, smooth surface with thin-set is difficult. You can make it smooth enough for ceramic tile or a hover floor but probably not smooth enough for vinyl flooring. For a faster, smoother skin-deep, reinstalling the cable without ally committee and pour on “self-leveling compound, ” or SLC( Photo 2 ). SLC is a cement-based powder that you mix with ocean and then pour over the cable. It becomes rock hard in a few hours. Reinforce the SLC with plastic lath; metal lath can trim the cable. Covering your flooring with a 1/2 -in.-thick mantle of SLC overheads about$ 2 per sq. ft ., including the lath. You can then lay tile, carpet, vinyl or a float storey immediately over the SLC.
Electric plan# 2: Mesh matteds ($ 10 to $12 per sq. ft .) 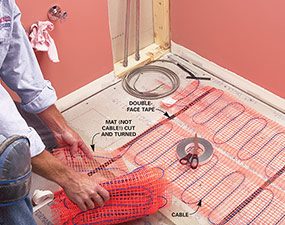
Mesh under tile
Cut mesh mattings to fit the storey. Position matteds with double-face tape and fasten with glue or staples. Cover the mesh with thin-set or self-leveling compound.
The cable comes once knitted into a plastic net. The pre-positioned cable installs quickly–in less than half the time for release cable. You simply staple or sizzling cement the mesh to the floor. As with loose cable, you then embed the cable and mesh.
Mats are available in lots of different dimensions. You can trim the mesh into areas to cover your storey or adapt around areas( photo ). But you can’t chipped or splice the cable itself. Some manufacturers recommend combing thin-set directly over the mesh and designating tile all in one busines. But this is difficult. Most tile setters has agreed to embed the mesh first with thin-set or SLC just as with loose wire. The mesh tends to “float” as you embed it, so fasten it to the floor every 6 in .– even if the instructions recommend less lodging. After embedding it, you can lay tile, carpet, vinyl or a float floor.
Electric system# 3: Solid matteds ($ 10 to $20 per sq. ft .) 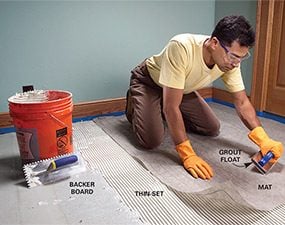
Photo 1: Under tile
Lay the matting over thin-set and force it securely into the thin-set with a grout move. After it hardens, combing more thin-set over the matted to set ceramic tile. 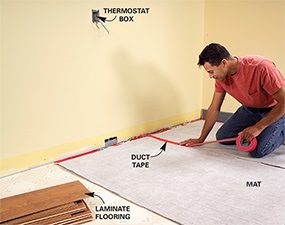
Photo 2: Under a drifting storey
Lay mats over an existing floor and duct-tape them together. Lay a drifting lumber or laminate flooring immediately over the mattings. 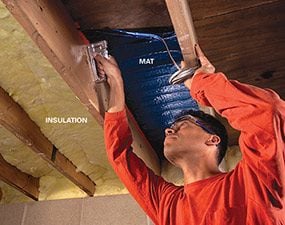
Photo 3: Under-floor technique
Staple mats between joists to heat the flooring above. Then insulate the underside of the mat with R-1 3 or thicker fiberglass batts.
Solid mats are often the most expensive electrical arrangement, but they’re also the easiest to install. The cable is completely enclosed in synthetic fabric, plastic sheeting or metal foil. The big advantage is that you don’t have to embed it as you do loose cable or mesh matteds. With some versions, you simply smooth the rug onto a berthed of thin-set( Photo 1 ). Then you spread more thin-set over the matting and positioned ceramic or stone tile as you ordinarily would. Some solid rug methods are even easier to install; you time roll out the mats, videotape them together and you’re done( Photo 2 ). You is available to sit a swim lumber or laminate flooring immediately over it.
Mats are available for consultation in various dimensions, and you can combine mats of different sizes to cover your floor. Some rugs are sized to fit between joists, so you can heat the storey from below( Photo 3 )– a big advantage if you don’t want to supersede an existing floor. However, don’t install electric hot under a subfloor unless the system is specifically intended for that method.
Floor Coverings and Heated Floors
Any flooring material can comprise a hot floor, but some are better than others.
Ceramic and stone tile are the most common. Heat doesn’t harm them and they brace and manage heat best. Solid timber floors can develop gaps if they dry and wither when heated. If you opt for solid wood, leave the installation to an experienced pro who will test the moisture content of the lumber to avoid shrinkage. Float floors made from wood or plastic laminate don’t develop chinks because they’re not fastened directly to the subfloor. But you’ll have to limit the storey temperature. Flooring certificates often limit the temperature to 85 measures F. Vinyl floors have similar temperature controls, whether they’re expanse vinyl or tile. Carpets or carpetings can go over a heated flooring, but they act as insulators and increase hot flood to your foot and to the room as a whole. If you choose electrical heat under hard flooring and plan to use an arena carpeting, consider installing the cables merely under the flooring that won’t be covered by the rug.
Hydronic arrangements heat infinite as well as your toes Hydronic radiant floor heating installation: 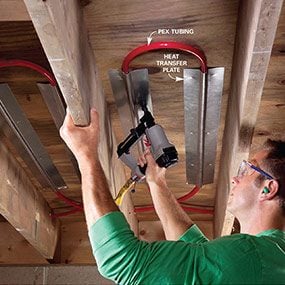
Photo 1: Under-floor technique
Drill loopholes in joists and loop tubing between them. Install metal plates to support the tubing and give heat. Insulate with fiberglass batts. 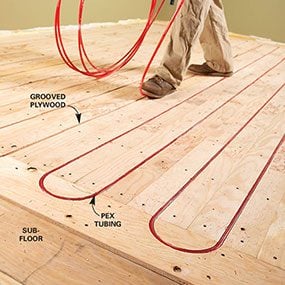
Photo 2: Channel technique
Install a canal organisation over a grove or concrete subfloor. Press tubing into the grooves. Install a grove or floating floor or include sponsor card for tile.
In a hydronic system( Anatomy B ), heated irrigate from a boiler or a ocean heater extends through loops of adaptable plastic tubing called “PEX.”( PEX can be used for household water supply threads extremely .) The hot tubes then heat the flooring. The main advantage of hydronic structures is that they generally deliver more heat at a lower operating cost than electric plans. That’s why hydronic hot is typically a better alternative than electric systems to heat large floor orbits or even an part house. However, because they usually involve a boiler, a shoot and gas texts, hydronic structures are more complex than electric organizations. You can position hydronic floor heat yourself, but you need basic electrical and plumbing know-how as well as professional layout help.
Hydronic radiant floor heating installation payment:
The materials for a small-scale hydronic assignment will cost at least $600.
The easiest–and least expensive–way to install PEX is to run it under a subfloor between joists applying carry-over platefuls and insulation( Photo 1 ). The method used costs less than$ 2 per sq. ft. for tubing, plates and insularity. To set PEX on top of a wood-framed or concrete storey, you need to lay a well-grooved direct plan over the flooring( Photo 2) or embed the tubing in self-leveling compound( identify Figure B ). Covering PEX asks more SLC than you can mix yourself; leave that to pros who have special mixing and shooting rig( at least$ 2 per sq. ft. for the SLC exclusively ). With a concrete storey, you may have to lay foam insulation over the slab before positioning PEX. In new construction, the tubing is often set over insularity and the concrete slab is moved over it.
A hydronic arrangement requires several expensive constituents. But several apartments share the components, so the more expanse you heat, the lower the cost per square foot. If you want to heat 200 sq. ft. or more of storey, a hydronic arrangement may expenditure little to install than electric heat.
The heat source for a hydronic structure can be a boiler or a standard water heater. If your dwelling is already heated by hot water radiators or baseboard cells, there’s a good chance that your existing boiler can direct the hydronic structure as well. If you don’t have a boiler, a water heater can heat one room or several, depending on the size of the water heater. If you’re building an addition, you may find that installing a water heater-powered hydronic flooring is less expensive than extending your existing center heating system.
Aside from PEX, a hot root and a shoot, a hydronic arrangement may be needed constituents such as electric zone valves. It may also require additional runs. You can install these components yourself, but don’t try to design a organisation yourself. Look for a company that specializes in facilitating homeowners intention and lay hydronic plans. Before you choose to install a method yourself, get bids from professionals. It will assist you decide whether the money saved is worth your time and effort.
Figure B: Hydronic Floor Heat
Self-leveling compound technique. A boiler or sea heater hots water, which is then shot through a loop of embedded tubing. The heated ocean hots the floor.
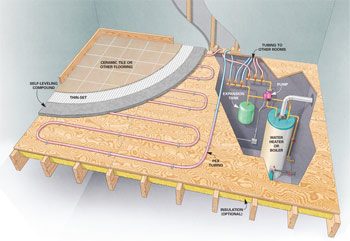 Figure B: Hydronic floor heat details
Additional Information for this radiant heat system project
Figure A: Electric Floor Heat Figure B: Hydronic Floor Heat
Read more: familyhandyman.com


Have a look at these other posts:
 S Places to Find Secondhand Gifts Your Friends and Family Will Adore
 The Hotel Roanoke: Going Back Home in Style
 Overstock plummets 19% on slashed revenue forecast, CFO resignation (OSTK)
 These H Money Tricks Helped Me Save $B,000 a Month
 Samsung’s new foldables have already got 800,000 pre-orders in only one market
 Virginia Cavaliers at Miami Hurricanes NCAAM Pick – March A, 2020
 What We Love/Hate About Conferences
 A Things You Must Do to Become an Environmental Entrepreneur
 How Green is Your Bailout?
 The Corner Office—A Rusty Artifact of the Past
 No Escape: What Trump’s Border War Looks Like From a Guatemalan Village
 Tensions abate as Dems await value of social spending invoice
